How to guides
The below How to Guides explain how to use functions of the Group Sales Optimiser.
Glossary
| One way | An itinerary that starts at one point (origin) and travels to another point (destination) and does not return back to the point of origin. |
|---|---|
| Round trip | A return itinerary where travel starts and ends back at the point of departure. |
| Multi city | A multiple city itinerary which has either a surface sector, open jaw or stopover on route i.e. BNE-SYD/-MEL-BNE |
| Multi origin | The Multi-Origin tab provides you the ability to book multiple origin departure points for those groups that have guests arriving from various cities to the same destination. Example where the Main Event destination is Brisbane and you have guests travelling from various ports of Australia – MEL, SYD, PER. |
| Series | The Series tab provides the ability to request groups with reoccurring itineraries over a certain period. For example a Mining company that has employees flying in on a Monday and out on a Friday for a three month period. |
How to book
Step 1 - Log into GSO System
> The URL link then directs you through to Double Log In
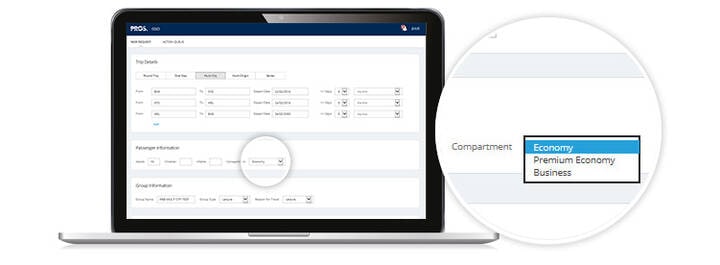
Step 2 - Select 'One Way' or 'Return' function
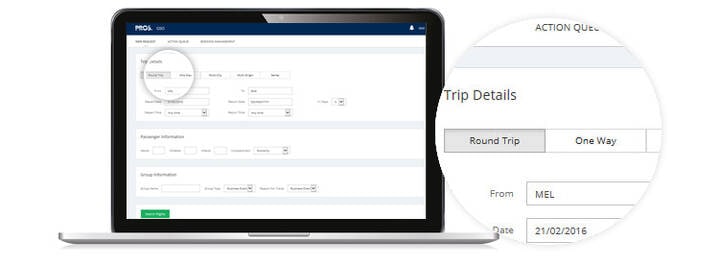
> Enter From and To (Origin and Destination) for all required sectors
> Select departure date required – Select particular departure and return time if required
> Enter Passenger Information – Adults / Children / Infant
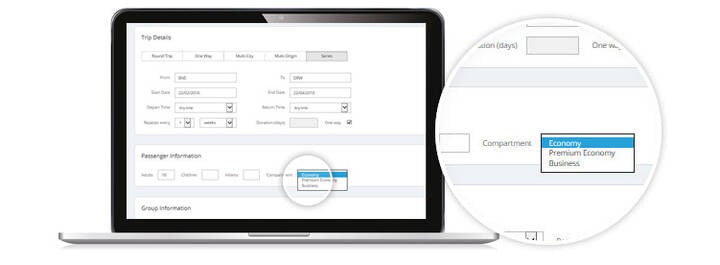
> Select your Compartment Type
Step 3 - Enter in 'Group Name'
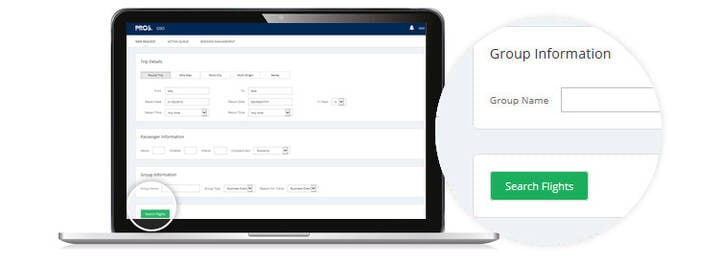
> Enter in Group Name – ensure this is entered in capital letters and alpha characters only
Step 4 - Select 'Group Type' and 'Reason for Travel'

> This drives the Terms and Conditions and should be selected correctly (Group Type and Reason for Travel should be the same)
Step 5 - Select 'Search Flight' button
HINT: You can continue to request new quotes while the previous ones are processing. You will be notified by a red number on your Notification Bell in the top right hand corner when a request is ready to be viewed or completed.
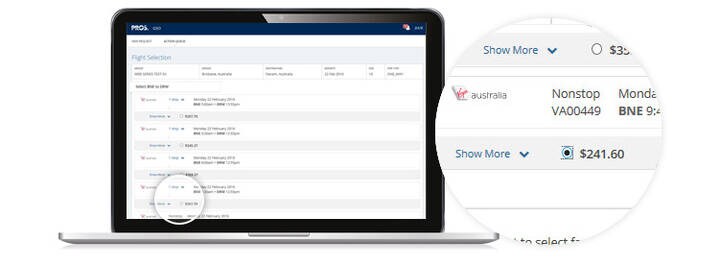
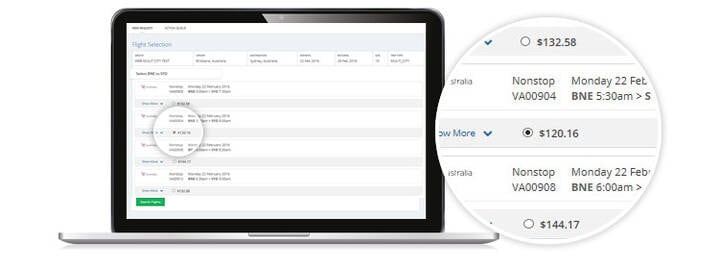
Step 6 - Choose Flights by selecting the radio button

Step 7 - Choose all flights required
Note: Click on the Green Preview Offer button to request offer
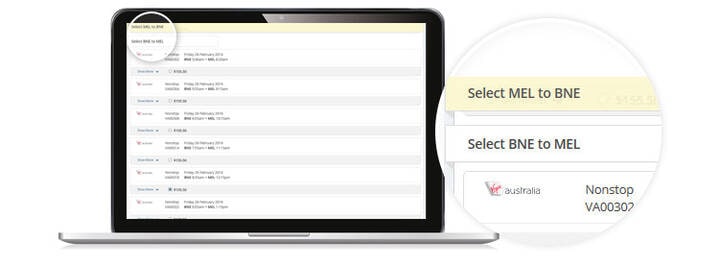
> You will note the yellow band at the top of the page highlights which flight selection you are ind.
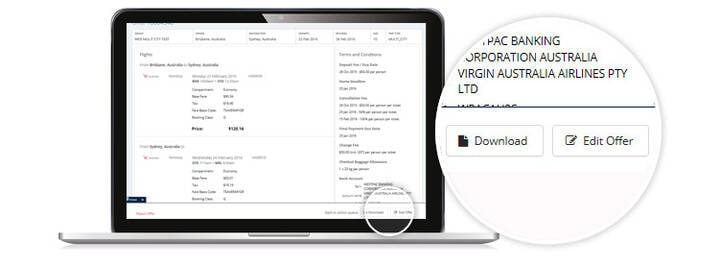
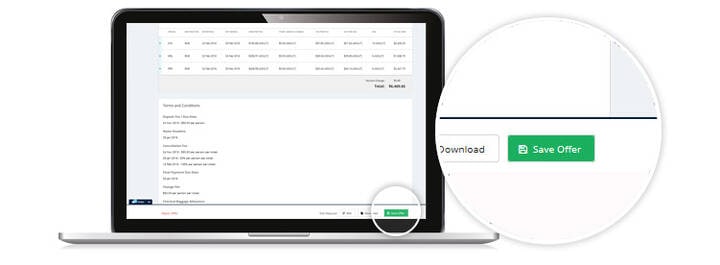
Step 8 - Preview Offer and Summary of Terms and Conditions
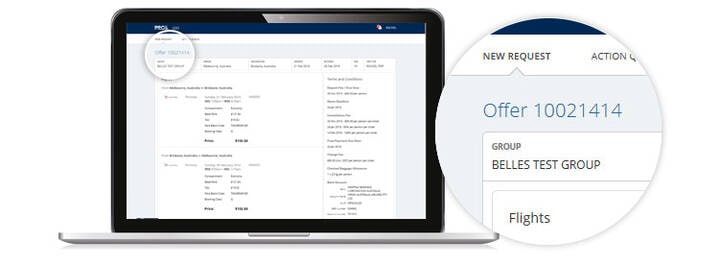
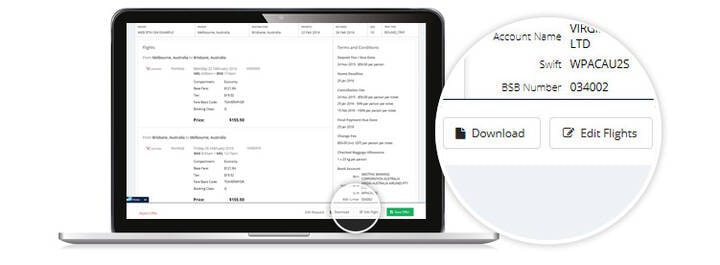
> Save the Returned Offer
> Edit Flights or Download Offer
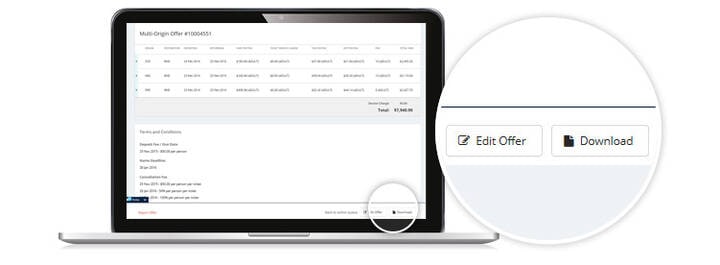
Step 9 - Retrieve quote from the Action Queue
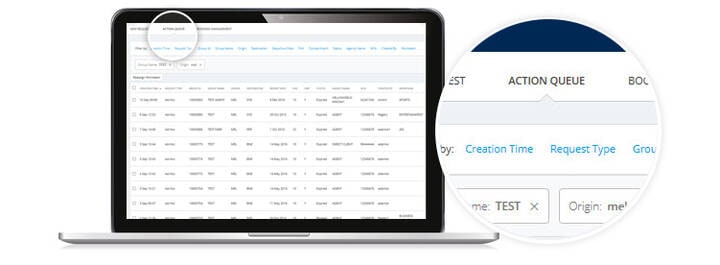
> You can Download, Edit or View offer from Action Queue
Step 10 - Downloaded Document View – Group offer and Terms and Conditions
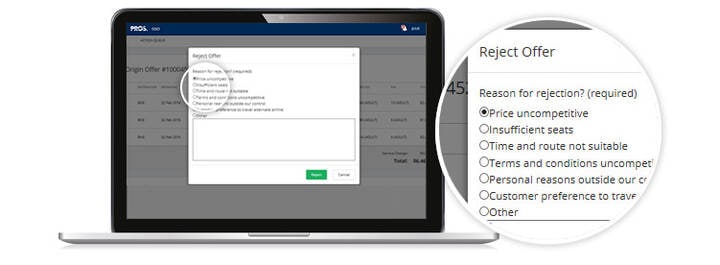
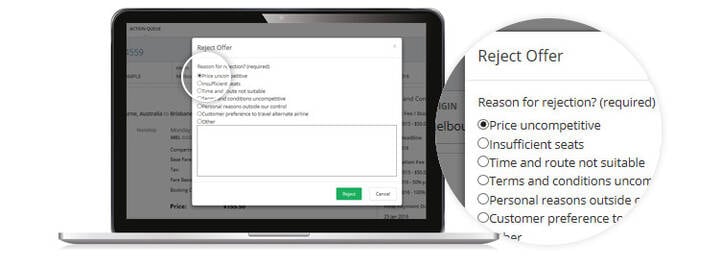
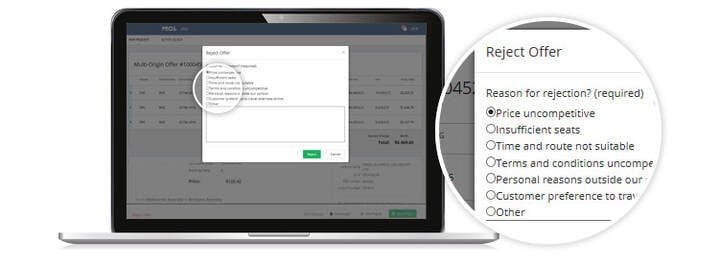
Step 11 - You can reject the offer, and complete the reject comments
Step 1 - Log into GSO System
> You will then be directed through to Double Log In
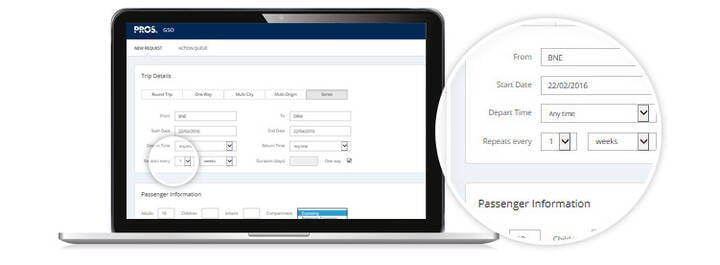
Step 2 - Select Series
> Enter in From and To Information – Origin and Destination

> Enter Series Flight Start Date and end date for the Date of the main group
Step 3 - Select how often you want this to repeat – example every week
> Select one way option if applicable
> Enter passenger information – Adults / Children / Infant
Step 4 - If applicable select compartment type - Economy Cabin
> Enter in Group Name in Alpha characters only
Step 5 - Select Group Type and Reason for Travel
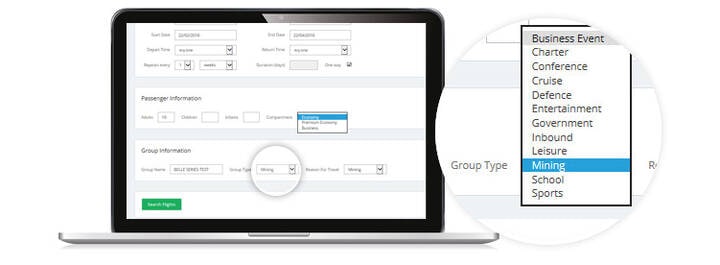
> Group Type and Reason for travel should be the same. This drives the Terms and Conditions and should be selected correctly.
Step 6 - Search Flights
HINT: You can continue to request new quotes while the previous ones are processing. You will be notified by a red number on your Notification Bell in the top right hand corner when a request is ready to be viewed or completed.
Step 7 - Select flights by selecting the radio button
> You have the option to select different flight for each week, by choosing Next Departure selection
Step 8 - Auto Select Remaining Departures
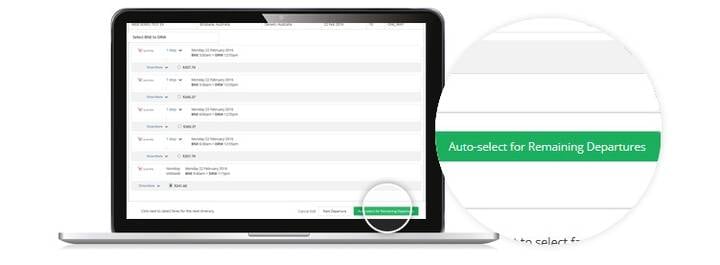
> To Auto Select the same flight for the remaining date selection choose the 'Auto select for Remaining Departures' button
> Save the returned offer.
Step 9 - Download contract
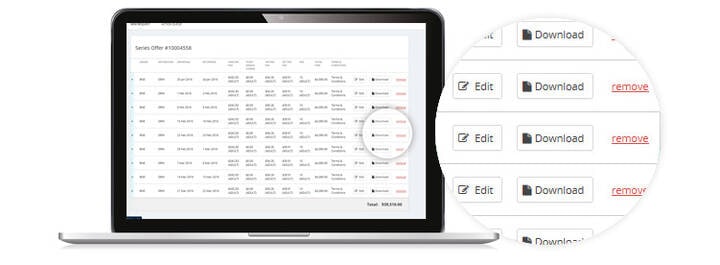
> You may Edit or Download a particular flight option if you require information on or edit a flight option on a particular date
> You may remove a specific flight date if you no longer require
Step 10 - You can reject the offer, and complete the reject comments
Step 1 - Log into GSO System
> The URL link then directs you through to Double Log In
Step 2 - Select Multi City Selection

Step 3 - Enter From and To (Origin and Destination) for all required sectors
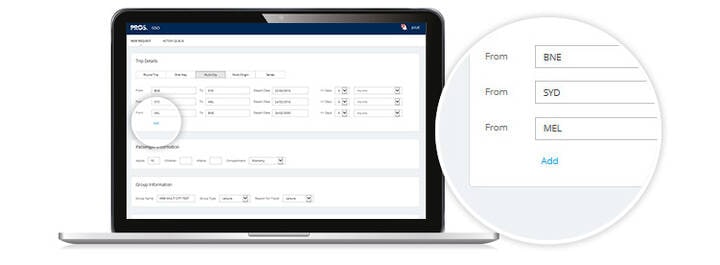
> Select Add Button to add in more sectors
> Enter departure date required – Select particular departure and return time if required
> Enter Passenger Information – Adults / Children / Infant
Step 4 - Choose relevant compartment type (i.e. Economy)
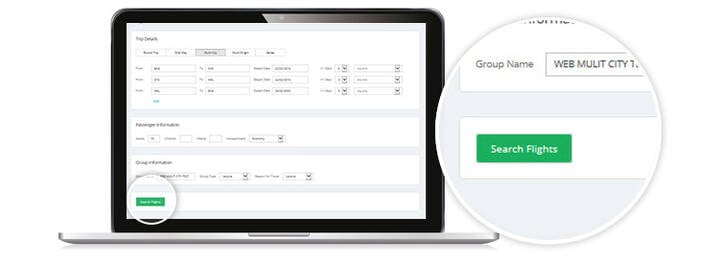
Step 5 - Enter in Group Name in alpha characters only

> Select Group Type and Reason for Travel – This drives the Terms and Conditions and should be selected correctly (Group Type and Reason for Travel should be the same)
Step 6 - Search Flights
Step 7 - Select flight by selecting the radio button
> Select all flights options on the page until you reach the Preview Offer – (you will note the yellow band at the top of the page is present to highlight which flight selection you are in)
Step 8 - Save the returned offer, edit flights or download

> Returned Multi City Offer once previewed
Step 9 - Once the offer has been saved you can retrieve quote from the Action Queue
> Download, Edit or View offer from Action Queue
Step 10 - You can reject the offer, and complete the reject comments
> Complete the reject comments when using
Step 1 - Log into GSO System
> The URL link then directs you through to Double Log In
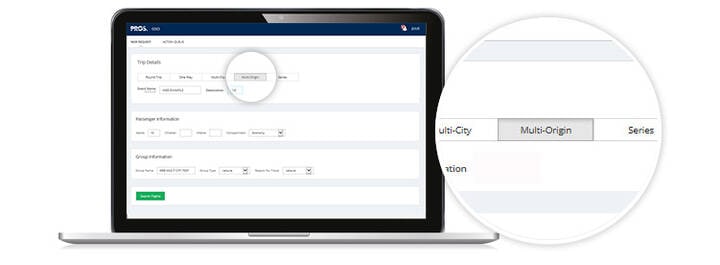
Step 2 - Select Multi Origin under trip details
Step 3 - Enter in Event Name and Destination

> Add in Main Destination, with Origin Points and Travel Dates.
> Enter Passenger Information – Adults / Children / Infant
> Select Compartment Type – example Economy
Step 4 - Select - Add another origin - to add in further sectors

Step 5 - Enter in Group Name – Ensure this is in alpha characters only
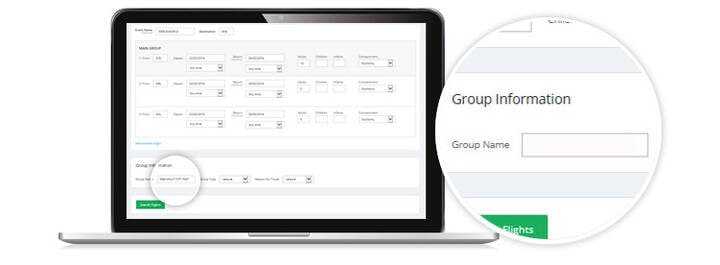
> When entering Group Name ensure you put in the type of group as the first word in the Name – example EVENT ABC, or SPORT MMM School
> Select Group Type and Reason for Travel – This drives the Terms and Conditions and should be selected correctly (Group Type and Reason for Travel should be the same)
Step 6 - Search Flights
HINT: You can continue to request new quotes while the previous ones are processing. You will be notified by a red number on your Notification Bell in the top right hand corner when a request is ready to be viewed or completed.
Step 7 - Select Flights by selecting the 'Select Option'
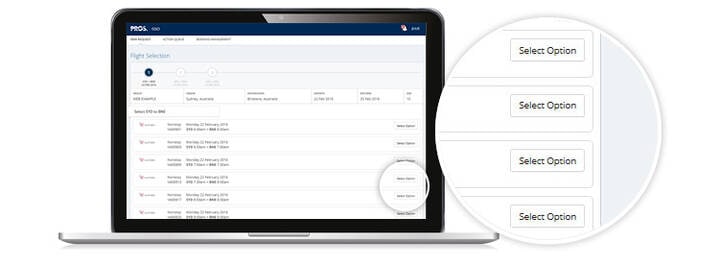
> Select ALL flight options on the page – you will note the yellow band at the top of the page will highlight which flight selection you are in.
Step 8 - Continue until you can select 'Preview Offer' button
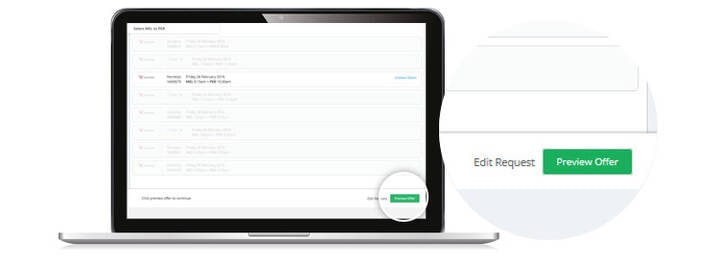
> Continue until you can select Preview Offer
> Only the schedule is displayed until the final flight is selected and returned
Step 9 - Multi-Origin returned offer
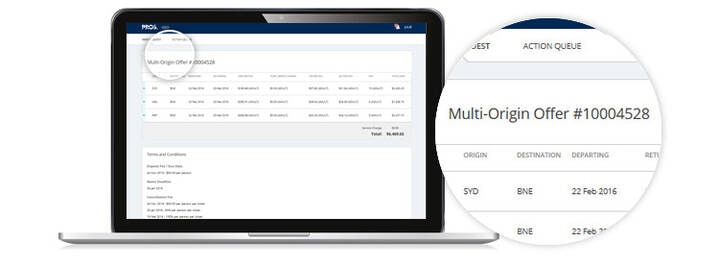
Step 10 - Save the Returned Offer, Edit Flights or Download Offer
Step 11 - Once offer has been saved you can retrieve offer from Action Queue
> Download, Edit or View offer from Action Queue
Step 12 - You can reject the offer, and complete the reject comments